Click2Call recommends the Secure VoIP App for iPhone, Android, and Windows users, and the Telephone App for Mac users. Both apps are free to download and work with your Click2Call phone number and password. Select your platform below to get started.
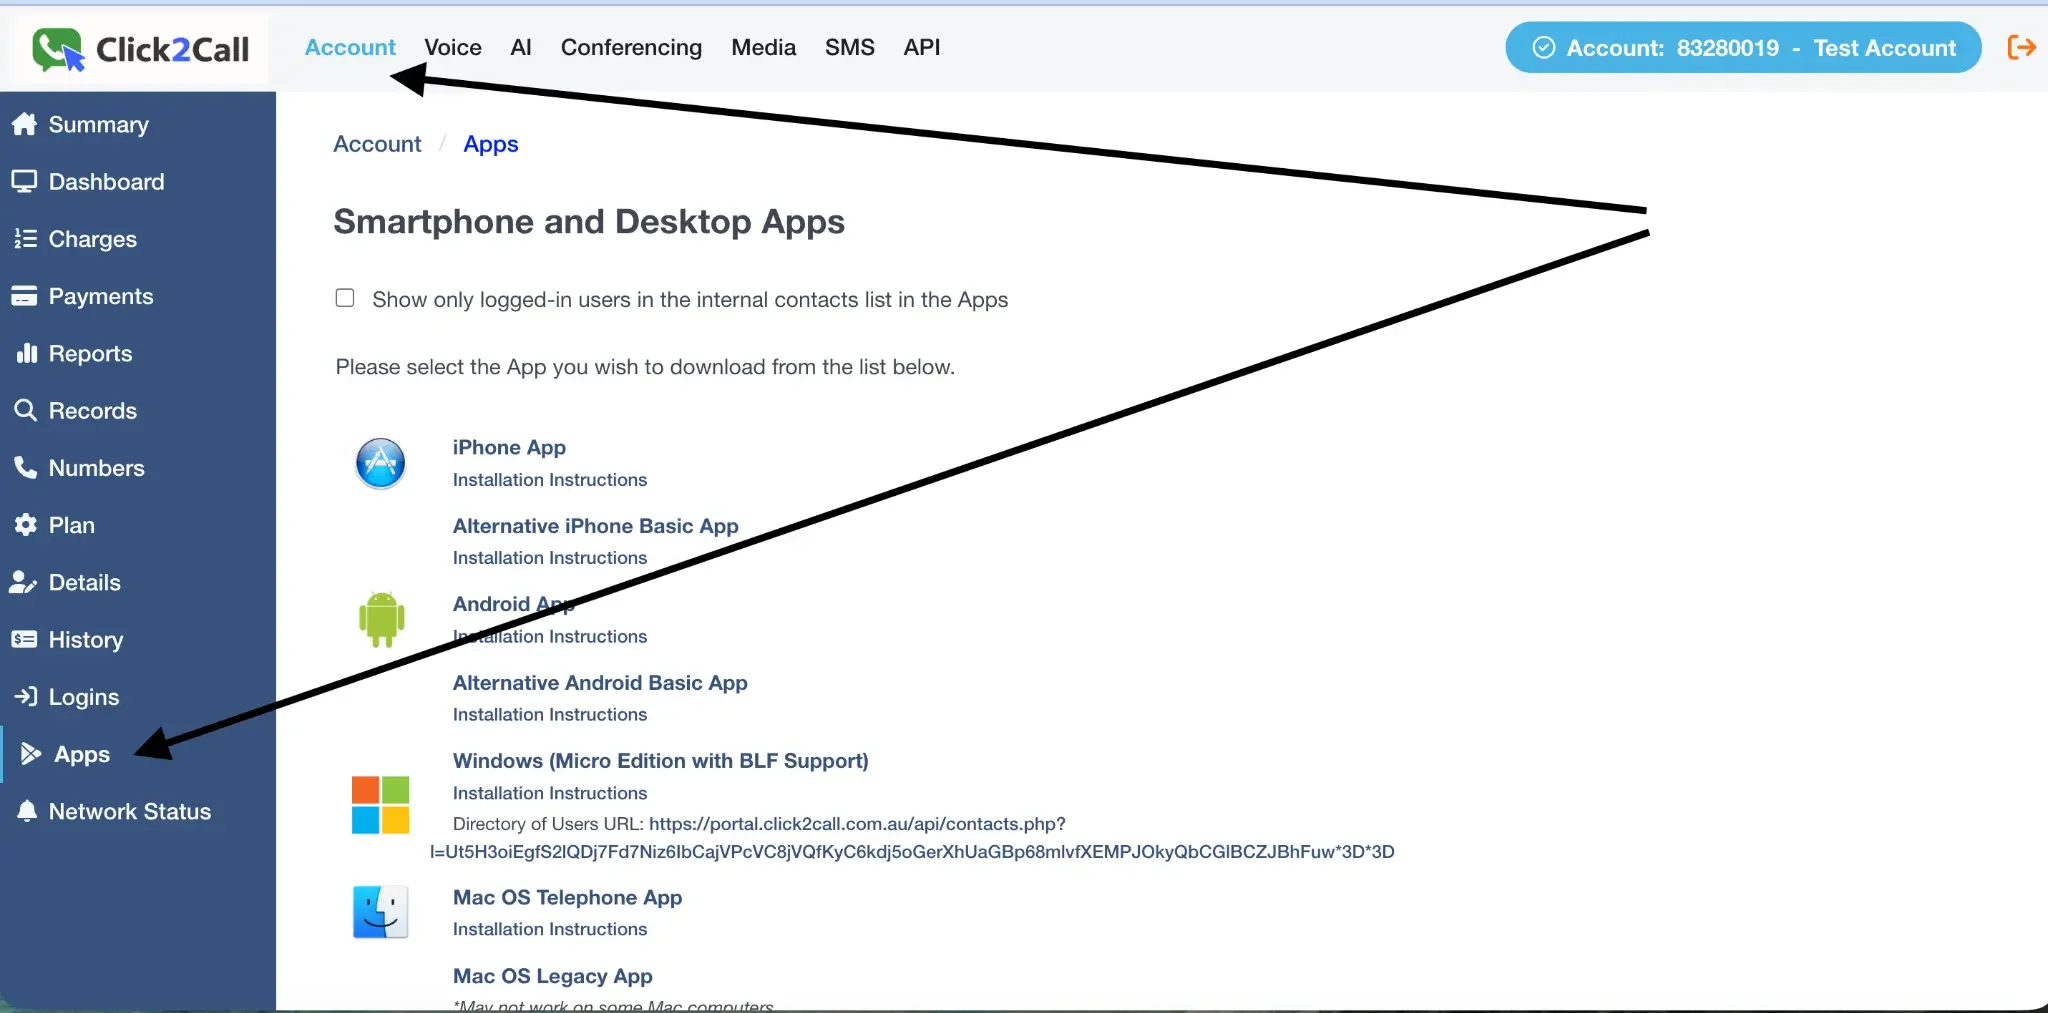
To find your app download links, log in to the portal, click the Account tab, and select Apps from the left-hand menu. From here you can download the app for your device and access the installation instructions for each platform.
Your Click2Call login details (all platforms)
You will need the following details to log in to any of the apps below. Your phone number and password are available in the Click2Call portal under your number settings.
Field
Value
Username / Phone Number
Your Click2Call phone number as shown in the portal (e.g. 07 4444 1234)
Password
Your line password (set in the portal, or your account password if not separately configured)
On your iPhone or iPad, open the App Store and search for Secure VoIP, or tap the link above to go directly to the download page. Install the app and open it.
2
Allow permissions
When the app opens for the first time, you will be prompted to allow access to notifications, photo library, camera, and contacts. Select Allow for each of these. Granting all permissions is important to ensure all features of the app work correctly.
3
Log in with your Click2Call details
Enter your Click2Call phone number and password (see the credentials table above). Tap Log In to continue.
4
Allow microphone access
On the main dialler screen, tap the button in the bottom right corner with the three dots. In the pop-up that follows, tap the button with the phone icon on the left. This will place a test call to your voicemail to simulate a phone call. When prompted, select Allow for microphone access. All permissions are now granted and the app is ready to use.
On your Android device, open the Play Store and search for Secure VoIP, or tap the link above to go directly to the download page. Install the app and open it.
2
Allow notifications
When the app opens for the first time, select Allow for notifications. This is essential — without notification permission, the app will not be able to wake up to alert you of incoming calls.
3
Log in with your Click2Call details
Enter your Click2Call phone number and password (see the credentials table above). Tap Log In to continue.
4
Make a test call and grant remaining permissions
On the main screen, tap the button in the bottom right corner with the three dots. In the pop-up that follows, tap the button with the phone icon on the left to place a test call to your voicemail. Microphone access may be requested at this point depending on your device — select Allow. As you navigate to other parts of the app for the first time (such as the Contacts screen), you will be prompted for additional permissions. Always select Allow to ensure all features work correctly.
Click the download link above to download the installer. Once downloaded, double-click the .exe file to begin installation. If Windows shows a warning about running an unrecognised app, click More Info and then Run anyway to continue. Select your installer language and click OK, then click Next and follow the prompts to complete the installation. Click Finish to launch the app.
2
Log in with your Click2Call details
When the app opens, you will be prompted to enter your username and password. Enter your Click2Call phone number as the username (e.g. 07 4444 1234) and your line password. Do not enter your account number — it must be a phone number. Click Save to log in.
3
Confirm you are online
If your details are correct, the dialler screen will appear and you will see an Online indicator in the bottom left corner of the app. You are now ready to make and receive calls.
4
Add contacts (optional)
Switch to the Contacts screen to add contacts to your address book. Right-click in the contacts area to add, edit, or import contacts. To synchronise contacts from your Click2Call account automatically, click the three horizontal lines in the top right corner of the app, select Settings, and check the Directory of Users setting. Internal contacts on your account will show online/offline and busy status in real time.
5
Enable multiple calls and transfers (optional)
To handle attended and blind transfers or take multiple incoming calls simultaneously, go to Settings and untick Single Call Mode. The app will then be able to manage multiple calls at the same time.
Note: The Telephone app connects using SIP UDP by default. UDP is unencrypted and can be blocked by some firewalls. We recommend switching to TLS immediately after setup (see Step 4 below) for a more secure and reliable connection.
1
Download and open the Telephone app
Download the Telephone app from the Mac App Store using the link above. Open the app once installed.
2
Enter your Click2Call SIP account details
When the app opens, you will be presented with an account setup screen. Fill in the following fields:
Field
Value
Full Name
Your name
Domain
sip.click2call.com.au
User Name
Your Click2Call phone number as shown in the portal (e.g. 07 4444 1234)
Password
Your line password (or account password if not separately configured)
3
Save and confirm the account connects
Click Add Account (or the equivalent save button). The app will attempt to register using SIP UDP. Once connected, you can make calls by entering a number in the text field and pressing Enter or clicking Call.
4
Switch to TLS for a secure connection (recommended)
Go to the Telephone menu in the top left of your screen and select Preferences. Click the Accounts tab and untick Enable this account to allow editing. Click the Network tab and under SIP Transport, select TLS instead of UDP. Return to the Account Information tab and tick Enable this account again. The app will reconnect using the encrypted TLS protocol.
5
Adjust audio and call settings (optional)
In Preferences, use the General and Sound sections to select your preferred microphone and speaker or headset. If you do not want to receive a second call while already on a call, untick Call waiting in the General section.